A wise man once told me “You are what you eat”. At the time I ate whatever I wished and being in my mid- 20’s and healthy, I saw little need to change my eating habits. Nowadays I eat “healthy” which includes whole wheat bread and, noting the cost of 100% whole wheat bread and wishing to be as self-reliant as possible, I decided to venture down the bread making route.
Acquiring a whole wheat bread maker
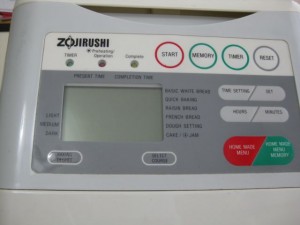
 First stop was a bread making machine (I could have tried hand kneading but I like machines) and my preference was for a good quality used machine. Craig’s list showed a make “zojirushi” and some research indicated this is a durable, well regarded but pricey item. I was able to buy, for a reasonable price, the model “BBCC-S15” which is at least 10 years old and was made in Japan (more recent models I believe are made in China). The manual included recipes for whole wheat bread so that closed the deal.
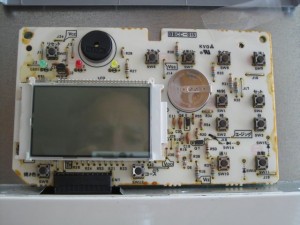
The machine worked fine except the battery, which keeps the date, had expired. From the internet I learned that the battery is soldered to the circuit board but can, with care, be replaced. This I was able to do.


Grinding whole wheat kernel/berry
The seller mentioned to me she also had a grain mill (brand name “Whisper Mill”) which I also purchased, and that she acquired her whole wheat and other ingredients and advice from Bread Beckers company, which fortuitously is located en route to my property.
The family members who operate the business are most knowledgeable and helpful, and I acquired hard red wheat, lecithin, gluten, flax seed and yeast. The Whisper Mill ground the red whole wheat well and I used a coffee grinder for the flax seed. I experimented with their Ezekiel bread mix, but the result was too dense for me. However, the whole wheat loaves are delicious. I include in the mix a free range egg, my harvested honey and 1/4 cup of unground sunflower seed.
There is one area for improvement – the top rises and then falls a little. I have experimented with increasing the gluten above the recommended amounts to compensate for moisture and will try out differing combinations to arrive at an unblemished loaf of whole wheat bread. In the meantime, the fallen top goes to the chicks.

Glad your machine is aware of the day and time 🙂 If you ever want someone to knead bread, I’m experienced and available. My resume will be in the mail…
Hello Nu Trac!
Tamara and Mark are sending a big hello to you and the family from Australia! I hope you are well! 🙂
Absolutely love this website! I had to show my mum because she has recently taken the bread-making a step further with making her own organic bread starter (for those irritable by store-bought yeast). After much resistance to this idea due to the smell and lengthy process of “feeding” the pungent matter over an 8 wk period, the bread actually looks and tastes like something out of a well established organic bakery!
Will be back to see more of your blog!
Tamara and Mark
Thanks for your greetings Downunders. I would love to learn more about an organic bread starter – how does your Mum prepare it?
Richard
Hi Rich!
The starter making is based on a 5-day feeding schedule as follows:
Day1
Genesis – work on a ratio of 50% water and 50% flour to starter. Use a clean bucket and place in it 50ml water and 50g organic plain flour. My mum added 1 organic grape skin to speed up the process of fermentation for better results.
Day2
First feed – the total weight of the starter is now 100g. For the first feed, add 50ml water and 50g organic plain flour. Stir the water and flour together with a wooden spoon, and gently fold it into the starter to combine. Cover with plastic wrap and set aside overnight.
Day3
Second feed – the total weight of the starter is now 200g. For the second feed, add 100ml water and 100g organic plain flour. Repeat as above, cover with plastic wrap and set aside overnight.
Day4
Third feed – the total weight of the starter is now 400g. For the third feed, add 200ml water and 200g organic plain flour. Repeat as above, cover with plastic wrap and set aside overnight.
Day5
At this stage you need to discard some of the starter, otherwise you will end up with too much starter that is not active enough to use. On day five, the total weight of the starter will be 800g. You need to reduce the starter weight to 100g, discarding the rest (700g) to the compost. Discard the grape skin at this stage as well.
After the first 5 days you need to repeat the first, second and third Feeds for a total of 3 weeks. Remember to discard 700g after the third feed (fourth day) each week to ensure the starter is getting stronger and you don’t end up with too much.
On the beginning of week four (dough making day) you need to increase the feeds so that the starter is ready to use in a dough, as follows:
First feed 1pm – 100g starter with 50ml water, 50g flour = 200g starter weight
Second feed 9pm – 200g starter with 100ml water, 100g flour = 400g starter weight
Third feed 6am – 400g starter with 200ml water, 200g flour = 800g starter weight
Note: Once you go to use the starter in a dough, remember to put 100g starter aside and continue feeding it for future use. If you are not making bread regularly and you have an established starter, it should survive in the refrigerator being fed once every 2-4days.
Note2: Feeding is always in proportion to the weight of the starter (Eg. 100g starter is fed with 50g flour and 50ml water etc)
RECIPE FOR ORGANIC SOURDOUGH BREAD:
400g white starter
760g organic plain flour
400ml water
20g sea salt
I hope SOME of this makes sense! It took me a while! I have the bread recipe if you decide to give it a shot!
Apparently if the starter bubbles and has a purple/grey colour, then you are on the right track!
All the best to you and the family!
Tam
Thanks Tam – I will give it a try.
My pleasure! Good luck 🙂