My Takeuchi bobcat will not crank. Following is how I diagnosed and fixed the electrical problems (yes there were 2) which prevented the bobcat from turning/cranking. Caveat – the methods outlined here are for information only; are not recommendations; can result in personal injury or death; and I assume no responsibility for any content on this website.
Step 1 – test the battery – see my testing procedures in my post dated February 1, 2017.
Step 2 – starting basics
My starting point is to study the wiring diagram, which I downloaded from the internet (I also have a workshop manual). I know the basics for starting an engine – you turn the key, it moves to the accessory/on position (dashboard lights up) and then to the start position (starter turns/cranks the engine) and the engine starts. You release the key and it reverts to the accessory/on position and stays in that position while the engine is running. To stop the engine you turn it anticlockwise to the off position.
For background I mention that a gasoline engine needs spark plugs to ignite the gas vapor in the cylinder, a diesel engine does not use spark plugs and the diesel vapor ignites when it is compressed in the cylinder. My Takeuchi has a diesel engine. Since the engine does not crank whether it it receives fuel is irrelevant to my testing.
So the only things to be checked should be the wiring from the positive battery terminal to the starter motor (a thick cable), and the wire from the positive battery terminal to the starter switch and then to the starter solenoid. And of course the wire (ground strap) from the negative battery terminal to the engine block. Sounds relatively simple.
But the wiring diagram did not look simple- lots of wires and components. The diagram provides the color and nominal cross section area (I will call it “csa”) of the wires. The wires usually have 2 colors – a base color and also a line or stripe on the base color.
Step 3 – tracing the wire from the battery positive terminal to the starter motor & starter switch
I located the battery on the wiring diagram and saw it connected to the starter with a 30 csa black wire. (A 30 csa wire is pretty thick – a 26.7csa wire=3awg & 33.6csa=2awg, so about 2.5awg). Then I saw there was a 3 csa red wire (2.63csa=13awg) from the starter black wire connection through a fusible link to the ignition switch/starter switch. Here I was confused – why was the starter switch connected directly to the battery? The starter switch initiates cranking by supplying current to the starter solenoid. I thought about it awhile and then it clicked – the starter switch was receiving current from the starter terminal and then, to crank the starter it was sending current to the starter solenoid. Now it seemed obvious.
So maybe the fusible link was defective or maybe the starter switch was bad. It took some time to check these were ok, especially tiresome opening up the controller cover (with the cab in a vertical position since it was pulled forward) to get at the underside of the starter switch. And, with hindsight, really unnecessary. Now I know that the starter switch receives its power through the fusible link and the fuel gauge receives its power from the starter switch, then if the fuel gauge, or water gauge moves when switch is in on position it means the fusible link and related wiring are ok. (The dashboard and exterior lamps don’t work, or I could have used them for the check).
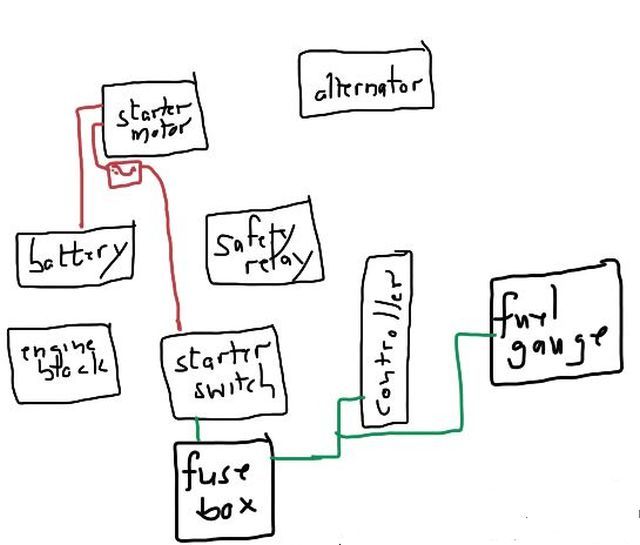
I also wasted time checking the fuses in the fuse box. These fuses have nothing to do with cranking the engine, as the following discussion and diagrams show. I focused on the wire from the battery and saw it was directly connected to some other components as well. With care, since these were live terminals even though the key was in off position, I could have checked with voltmeter there was voltage at the safety relay and the alternator. But I didn’t since I did not know where the safety relay was, nor the significance of the alternator.
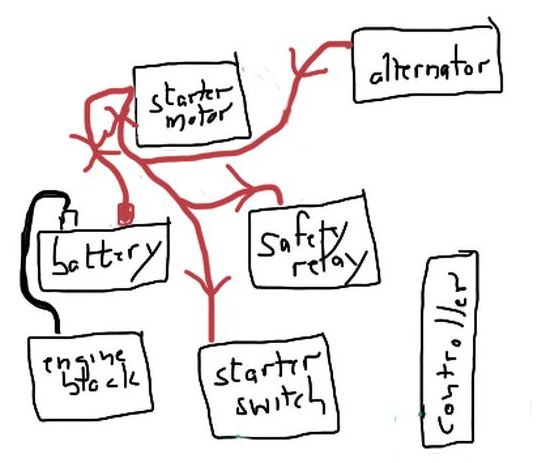
Step 4 – tracing from starter motor to starter switch
Individual wires disappear into bundles of wires and then emerge. The color coding can help – for example, if a LgR (light green base, red stripe) wire goes into a bundle and on the other end a LgR wire emerges chances are it’s the same wire. But the wires in my Takeuchi are old, discolored and faded. It’s better to do a continuity check. A voltmeter has 2 probes and when the continuity check position is selected it buzzes when probes touch each other or a continuous circuit. So touch a probe to one end of a wire and the other probe to the other end and if the buzzer sounds you have a circuit. Before I began tracing I disconnected both battery terminal clamps – I did not want to short a wire and damage components and myself. I made sure to remember when connecting a battery always connect positive first and then ground, and when disconnecting always ground first and then positive and always wear eye protection.
So my objective was to trace the wire attached to the starter solenoid back to the starter switch. It is 3 csa and color code is BY (black base, yellow line). I located the wire at the solenoid (it was yellow!) and traced it to where it disappeared with a lot of other wires into a junction. I looked around and found a similar csa similar color wire emerge and head to the engine block where it was secured to a metal flange. I tested to see if the solenoid wire connection point was continuous with the metal flange. It was. On a hunch I tested whether the metal flange was continuous with the engine block. It was. This confused me – no way should the solenoid wire be grounded to the engine block. This didn’t make sense at all. I concocted an explanation which was the solenoid wire went to the safety relay (as shown on the diagram) and the safety relay had a ground connection (also shown) and the relay I assumed had 2 positions, one for on and one for off and in the off position it connected to ground. Therefore I assumed the 2 wires were not directly connected but both went to the relay.
Now to find the relay. A parts schematic (downloaded from internet) showed it was in the vicinity of the wires I was working with and I found it easily. I located the yellow wire from the starter solenoid disconnected it from the relay switch and tested it was continuous to the starter solenoid. But it was also continuous with ground? My previous theory was blown, since when disconnected from the relay it should not be continuous with ground. I thought (I was doing a lot of thinking now) and concluded that the ground reading I was getting must be from the solenoid switch. So I disconnected the yellow wire from the solenoid switch. The loose end at the solenoid tested continuous with the loose end at the relay and was not connected to ground. Great. This was a single wire behaving as it should. And a lesson – when doing continuity checks disconnect the ends of the wire from any components. On closer examination, the wire to the engine block was white, not yellow and had nothing to do with the safety relay. A red herring.
I was beginning to feel confident again. At the safety relay is a 3csa RW (red base white line) wire which is carrying 12v unswitched (i.e. carries it all the time). Good, as per diagram above. So the way this relay works is a live wire from the starter switch is connected to the relay and when the key is turned to the start position a wire from the starter switch carries a current to the relay and this connects the powered 3csa RW wire to the 3csa yellow wire which then carries the current to the starter solenoid. The solenoid connects the 30B wire from the battery to the starter motor and the engine cranks.
The wiring diagram indicates the wire from the starter switch should be 1.25csa LgR (light green base, red line, 1.31csa=16awg). I found this wire and tested it by connecting my voltmeter one end to this wire and the other end to the positive battery terminal clamp (not connected to battery).
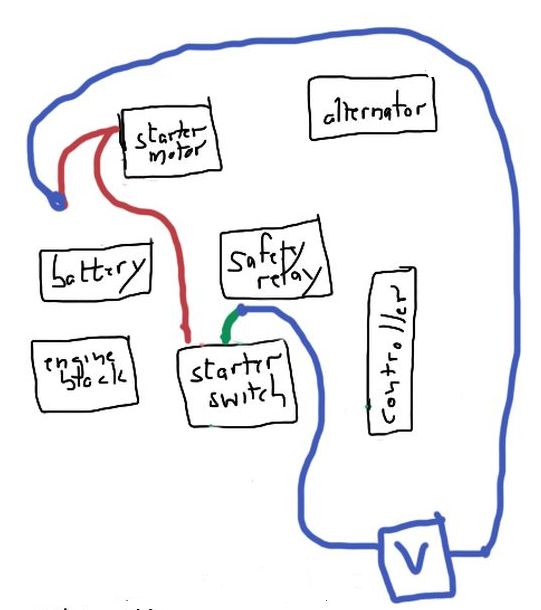
I turned the key to the start position and the continuity buzzer sounded. Great – the starter switch and the wires to and from the starter switch were ok. So why didn’t the engine start? I had a good battery and the starter was still pretty new and unlikely the relay was defective.
step 5 – understanding the safety relay
I studied the wiring diagram more and noticed another wire leading to the safety relay which was connected to the alternator and the controller/computer. I assumed, since it was called a safety relay, the wire from controller must be a safety feature -if the controller identified an unsafe condition it would prevent the relay from working. So I assumed if all was fine the controller would send voltage to the relay and if there was a problem or the controller was defective or disconnected there would be no voltage. Now I thought all I need figure is what defective condition the controller had identified. But then I focused on the wire to the alternator which was connected to the wire to the controller. Was this a mistake in the diagram and there were 2 separate wires, 1 from the alternator to the controller and one from the controller to the safety relay? But they appeared to be connected and both went to the same input terminal on the controller. So what was with the alternator?
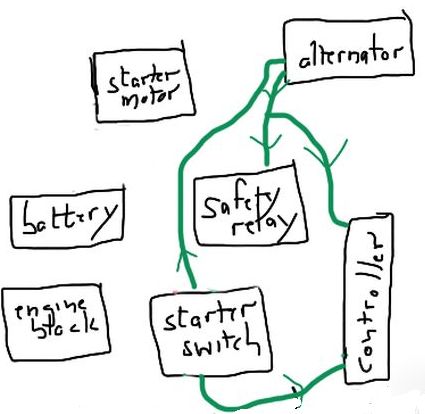
I first thought the alternator was supplying current to drive all the accessory items and the controller. But the wiring diagram shows the accessories receive their power from the starter switch via the fuse box. I read up about alternators and realized the wire from the alternator was the wire which lights the charge lamp on the dashboard. Of course it was! When I start my car, with key in accessory/on position the charge light comes on and when the engine is running it goes off (it goes off because the alternator is now generating current which comes through the other wire to the lamp and with both wires to the lamp having the same voltage, the lamp goes out). So the safety relay needed voltage from alternator to operate – not sure why this is a safety feature but there it is. The alternator on the bobcat has 3 terminals – one is connected to that 3csa wire which connects to the 30 csa wire from the battery – this is the charging wire for the battery. The second is from the starter switch accessory position – this is needed to excite or switch on the functioning of the alternator. And the third is the one which runs to the safety relay and the controller for the charge lamp on the dashboard. I wondered why not simply connect the second and third wires. I believe the explanation is because when the alternator is charging battery, voltage can be >14 volts while the third wire is regulated to not exceed 12 volts.
Phew! So I was making progress. My theory now was that the wire from the alternator was not carrying current to the safety relay when the key was turned to the accessory position. I turned the key to the accessory position and the alternator wire at relay tested 0.5 volts and 0.9 volts at the alternator and 1.15 volts at alternator when disconnected. I tested wire from key switch to alternator (2nd wire) it was 10.5 volts (should be 12.6v but I ignored discrepancy, my mistake- as I later discovered this was probably due to poor grounding). It appeared to me that alternator was defective.
To test this conclusion I decided to join the wire from alternator with the start wire from starter switch since with both wires receiving voltage the relay should work. I turned to start position and the relay clicked (remember I had disconnected the solenoid wire from the starter, which is why the engine didn’t start). So at this point I assumed the problem was a defective alternator and ordered a replacement.
step 6 -sourcing and installing a new alternator
My Takeuchi model is TL26 but the internet only showed alternators for TL126. Was there a difference? I didn’t want to buy the wrong alternator. But the internet is great and I was able to establish that both models use the same engine – Isuzu 4JB1. So I ordered for $96 the new, 1 year guaranty, TL126 alternator. It provides 35 amps and I noted the alternator for TL130 provides 50 amps but costs twice a s much. I decided to stay with the alternator specified for my engine. I won’t describe the installation procedure except that it took a long time – much, much longer than replacing an alternator on a car, since access space was very restricted.
For background I will mention that my Takeuchi was manufactured in 1999 (confirmed by Takeuchi representative after I provided serial #, and was one of the last TL26’s manufactured), is rated at 61hp and has a working weight of 3.01 tons. Unlike a car it is on tracks and, when it won’t start, cannot easily be shifted out of the way
The wire from the alternator to the safety relay now carried 12v. I connected all the wires, turned key to start position and – nothing!
step 7 – safety relay reconsidered
I was again stumped. When I connected relay input wire from alternator with input wire from starter switch and applied voltage, the relay clicked/worked. When I powered the wire from alternator and wire from starter switch separately, it did not. They are supposed to be powered separately because this is a safety relay and depends on inputs from both. So connecting the 2 input wires together overrides the design. Not a good ideal to bypass a safety feature but in this case the safety feature only ensured the accessory circuit was working and I could tell that by looking at movement of gauges with key in “on” position. I decided to go with what works and connected the 2 input wires together and connected them to the wire from the starter switch.
step 8 – work on starter motor
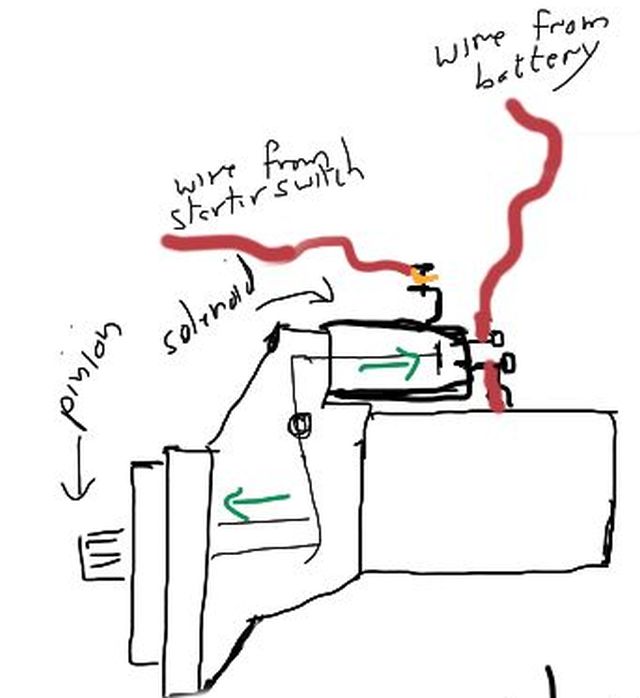
Believing I was approaching the end of the saga, I connected the wire from the safety relay to the solenoid tab on the starter motor and turned the key. Nothing! Maybe there was a problem with the current from the solenoid, so I disconnected the wire from the safety relay and connected a 14awg wire from the battery positive terminal to the starter solenoid tab. Turned the key and only got a click.
My first thought was that the pinion of the starter had jammed in the flywheel. This was exactly what occurred a couple years ago when I replaced the starter. But this was a new starter and would be bad news. I disconnected the clamps from the battery and loosened the 2 bolts securing the starter (to replace the alternator I had removed the bottom cover, so access to the lower starter bolt was easy). I did not hear the click which happens when the pinion releases from the flywheel. I was able to see the pinion was seated correctly. So what was the problem? I had a good battery, direct connections to the starter motor, a new starter motor and just a click. One possibility was the engine had seized/frozen. But this seemed unlikely – it worked fine last time. What else could it be?
step 9 – grounding the starter
With battery clamps on I measured the resistance between negative battery terminal and the chassis and between negative battery terminal and the engine block. There was resistance and it was greater from terminal to engine block than from terminal to chassis. I spent some time on the internet and read an excellent article by Fluke News Plus (Fluke is a high end test equipment manufacturer): “One of the most rampant electrical maladies showing up in automotive service bays today is the phenomenon known as voltage drop. Left unchecked, voltage drop causes countless unsolved electrical mysteries, especially when it infects the ground side of a circuit. It can also trick you into replacing parts that are not bad.” A good description of my travails.
When I loosened the bottom bolt of the starter I noticed it secured a 12″ braided ground strap which connected to the chassis. The negative terminal of the battery was connected with a ground cable to the chassis. I traced the battery ground cable to a well in the chassis where it was buried in 3″ of soil and small stones. The securing bolt seemed frozen. I decided to replace both ground straps. For $25 I purchased a battery ground strap and a chassis/engine ground strap both 1 gauge from Tractor Supply. I first replaced the strap from chassis to starter and when I turned the key I heard a louder click than before – encouraging. I connected the new ground cable from the battery to a bolt close to the battery, after wire brushing paint to ensure a good electrical connection. I turned the key and the engine cranked and started immediately. Mission accomplished.
Closing note
So there were 2 problems – bad grounding and a semi defective safety relay. I describe some of the tests – there were many others and several wild goose chases most attributable to the bedevilment of poor grounding.


I have a Takeuchi TL250.
Started a little slow but fine and ran fine last time about a week ago (long enough for the battery to not be perfectly charged).
However now it wont start, the warning lights all go on and buzzer sounds for 2 seconds (normal) but it wont turn over.
Back door where access the battery – can only see the positive terminal. Impossible to see the rest of the battery including the negative terminal.
I have Forestry Gaurding on the cab so it is not easy to tilt the cab up (guards are heavy and I dont have a crane to lift it off) also it is inconveniently parked on a slope (not supposed to tilt the cab when it is on a slope).
Thanks to your article – now I know that it would be good to start with the negative terminal of the battery and look for problems with grounding the battery to Engine Block/Chassis and Grounding at Starter motor.
I expect you will have made my job of getting my loader easier because of such a thorough diagnosis of the likely cause of what I suspect is a minor design fault with the electrical system in Takeuchi’s.
Thank you,
Thank you for your comments and I hope you have success. You may be interested how I tilted my cab forward when it wouldn’t start in the field – see the picture to my post dated 11/25/2014 – basically a chain hoist (used horizontally) attached to the top of the cab and a fence post, which was wedged between the body and the loader. However the situation you describe is more challenging.
Nice work! I learned a lot from your posts. I have the same problem, started weaker and weaker over 5 to 10 times, then nothing, just lights on the dash, then no lights at all. I have new battery, took out the starter and alternator and had them tested, both were good. We put in new ground wire and wire wheeled the post on the body, and added a ground from the battery to the bolt on the alternator as an extra ground.
Started fine, ran for a few days, then it started getting weaker and weaker when turning the key over. We let it sit over night, and then it fires right up, very strong.
I don’t have a problem putting parts on it that may not be needed, as they may go out sooner or later. I think next I’ll need the
safety relay.
Where is it and whats it look like?
Thanks for any help.
Thanks for your detailed post. I created the detailed post so I could retrace my steps if problems recurred. I do describe the safety relay in steps 4, 5 and 7 and provide specs for the wires which go to it. You should be able to locate it. You will notice in step 7 I overrode the relay for the reasons given. You should check that when the engine is running, the alternator is charging the battery, otherwise it will run down with time.
I hope it goes well with you.
Richard
Got it, there were two smaller red wire that were loose and corroded on the positive battery cable where they attach to the battery. couldn’t see the damage as there was some heat shrink on them. but they were getting hot when we were trying to start it, do to poor connection, so that’s how we found them. we put a test light on the key switch and were getting low power, so we look at the battery again.
all and all, we did some preventative maintenance, with the ground, new key switch, battery, etc.
running now, time to go make $.
thanks again.